Listen to the Podcast
This guide is designed to provide the basics of ventilating a child (it is not a detailed discussion of advanced ventilation techniques). It is my approach to ventilation in PICU using the Servo-i Ventilator and this may be different to what is done in other units or to what others may do in my unit.
Getting Started – Standby Screen

Select ‘Adult’ or ‘Infant’ mode (Infant mode is suitable for use between 0.5 – 30 kg and Adult mode between 10 – 250 kg, however the minimal tidal volume that be delivered in adult mode is 100 ml, so use infant mode up to 20 kg). Currently set mode can be determined by the icon in the top left hand corner.
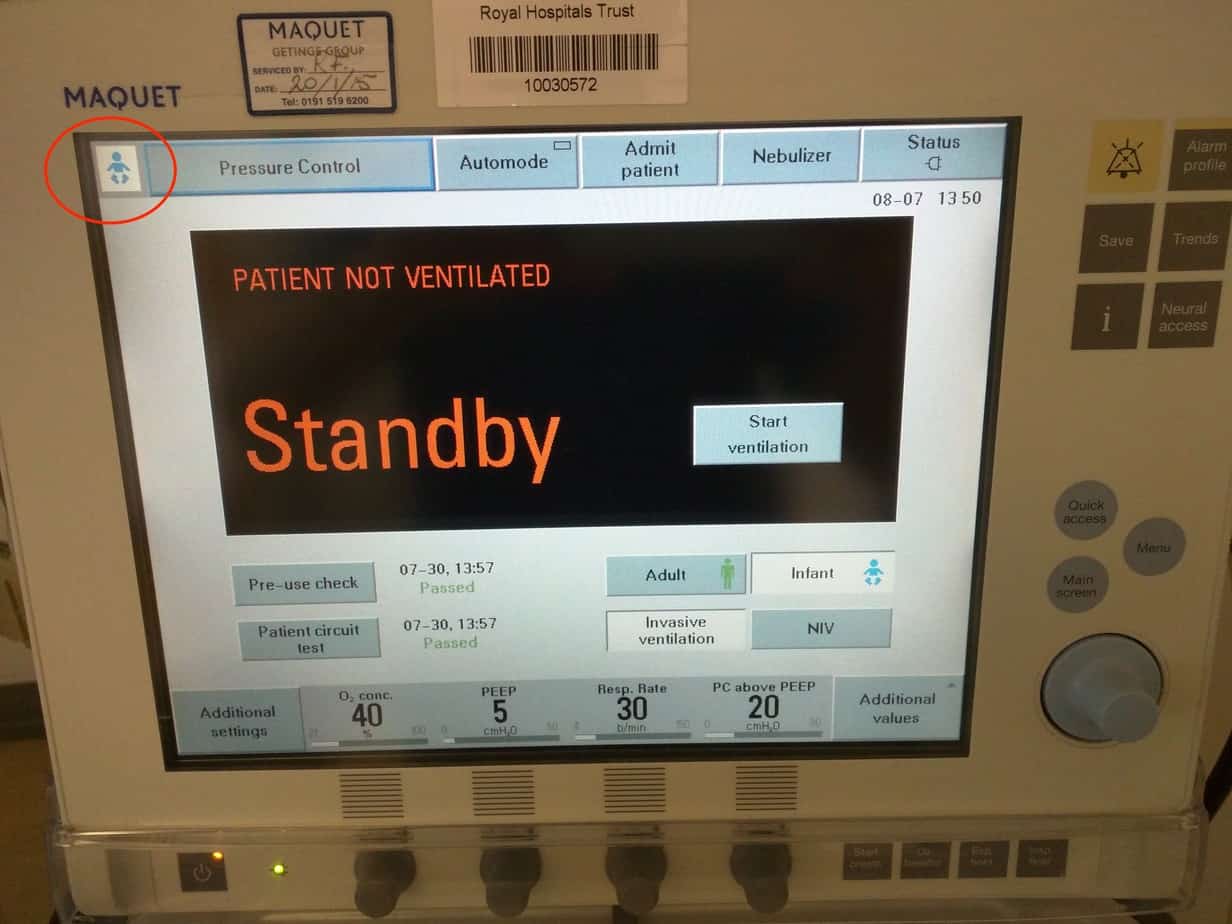
Select ‘Invasive ventilation’ or ‘NIV’ (if at a later stage you want to switch from invasive to non-invasive ventilation the ventilator must be returned to the standby screen by pressing the power button in the lower left hand corner.

Invasive Ventilation
Select Mode
Select desired mode by clicking on currently set mode in top left hand corner (default set to ‘Pressure Control’)

Select desired mode from list. My preferred mode of ventilation is ‘SIMV (PRVC) + Pressure Support’. Other modes used include ‘SIMV (Pressure Control) + Pressure Support’ and ‘PS CPAP’.

Set Tidal Volume
This is the volume the ventilator delivers with each breath. Tidal volumes between 5 – 10 ml/kg are used (7 ml/kg is a reasonable starting point). There are concerns that higher tidal volumes may cause lung injury.
Set I:E Ratio
This is the ratio of the time the ventilator spends in inspiration:expiration. Normally left at 1:2. In asthma an I:E ratio of 1:3 to 1:5 is used to prevent air trapping (allows more time for expiration). In neonates the I:E ratio can be reduced as far as 1:1 to allow for higher respiratory rates (start with 1:2 and only reduce if required).
Set Inspiratory Time (Ti)
This is the time that the breath is delivered over. Use the following:
< 1 year Ti = 0.6 – 0.8 seconds
1 – 5 years Ti = 0.8 – 1.0 seconds
5 – 12 years Ti = 1.0 – 1.2 seconds
>12 years Ti = 1.2 – 1.5 seconds
Currently the only way to adjust the Ti is to manipulate the ‘I:E’ ratio and the ‘Breath Cycle Time’. The currently set Ti is displayed in the top right hand corner.

NB – Adjusting the ‘I:E ratio’ and the ‘Breath Cycle Time’ will change the ‘Ti’ so this must be checked after any adjustment. Setting the Ti too short will result in the set tidal volume being delivered too quickly result in too high a pressure, setting it too long will limit the respiratory rate result in hypercapnia. An inappropriately set Ti is a common cause of patient discomfort and the patient struggling on the ventilator. Longer Ti are often used together with a high PEEP strategy in ARDS.
Set Breath Cycle Time
This is the total time for each breath cycle including inspiration and expiration, so will be determined by both the I:E ratio and Ti. For example if you have set an I:E ratio of 1:2 and you want a Ti of 1 second, you will want an expiratory time of 2 seconds, resulting in a Breath Cycle Time of 3 seconds. If you want an I:E ratio of 1:2 and you want a Ti of 0.6 second, you will want an expiratory time of 1.2 seconds, resulting in a Breath Cycle Time of 1.8 seconds.
Set the SIMV rate
This is the number of times per minute that the set tidal volume breath will be delivered and is dependant of what you have set for your breath cycle time. For example if you have set a breath cycle time of 2 seconds then the maximum SIMV rate you can set is 30 i.e 30 breaths each lasting 2 seconds (including inspiration and expiration). The ventilator won’t let you turn the rate above this maximum, so if you need to increase the rate, you will need to reduce the breath cycle time i.e. reducing the breath cycle time to 1.5 seconds will allow you to increase the SIMV rate to 40. The following are reasonable starting rates:
< 1 year SIMV Rate = 25 – 30
1 – 5 years SIMV Rate = 20 – 25
5 – 12 years SIMV Rate = 15 – 20
>12 years SIMV Rate = 12 – 15
Set the PEEP
Positive End Expiratory Pressure keeps the lungs inflated during expiration, preventing atelectasis. Start with A PEEP of 6 cmH2O in normal lungs. If there is significant collapse/consolidation start with a PEEP of 8 cmH2O and increase as depending on oxygen requirements. Remember excessive PEEP will impair preload due to increased intrathoracic pressure. PEEP is not normally reduced below 5 cmH2O to overcome the work of breathing through the narrow endotracheal tube.
Set the Oxygen Concentration
Provided it is not contraindicated it is better to start slightly higher to cover the transfer and settling in period on the ventilator and then reduce. Oxygen concentration should be kept <60% where possible in an attempt to avoid toxicity to the lungs.
Set the trigger
By default the trigger is set to a flow trigger with a sensitivity of 5. This should not be adjusted unless it is causing problems. The ventilator constantly monitors flow in the circuit and when the flow exceeds the set limit it determines that the patient is starting to take a breath and provides support. Turning the knob clockwise increases the flow trigger sensitivity (maximum 10) and makes it easier for the patient to initiate a breath, however also increases the risk of autotriggering (when something else causes the ventilator to think the patient is trying to take a breath when they are not e.g. leak round the tube or in the circuit, water in the circuit or cardiac oscillations).
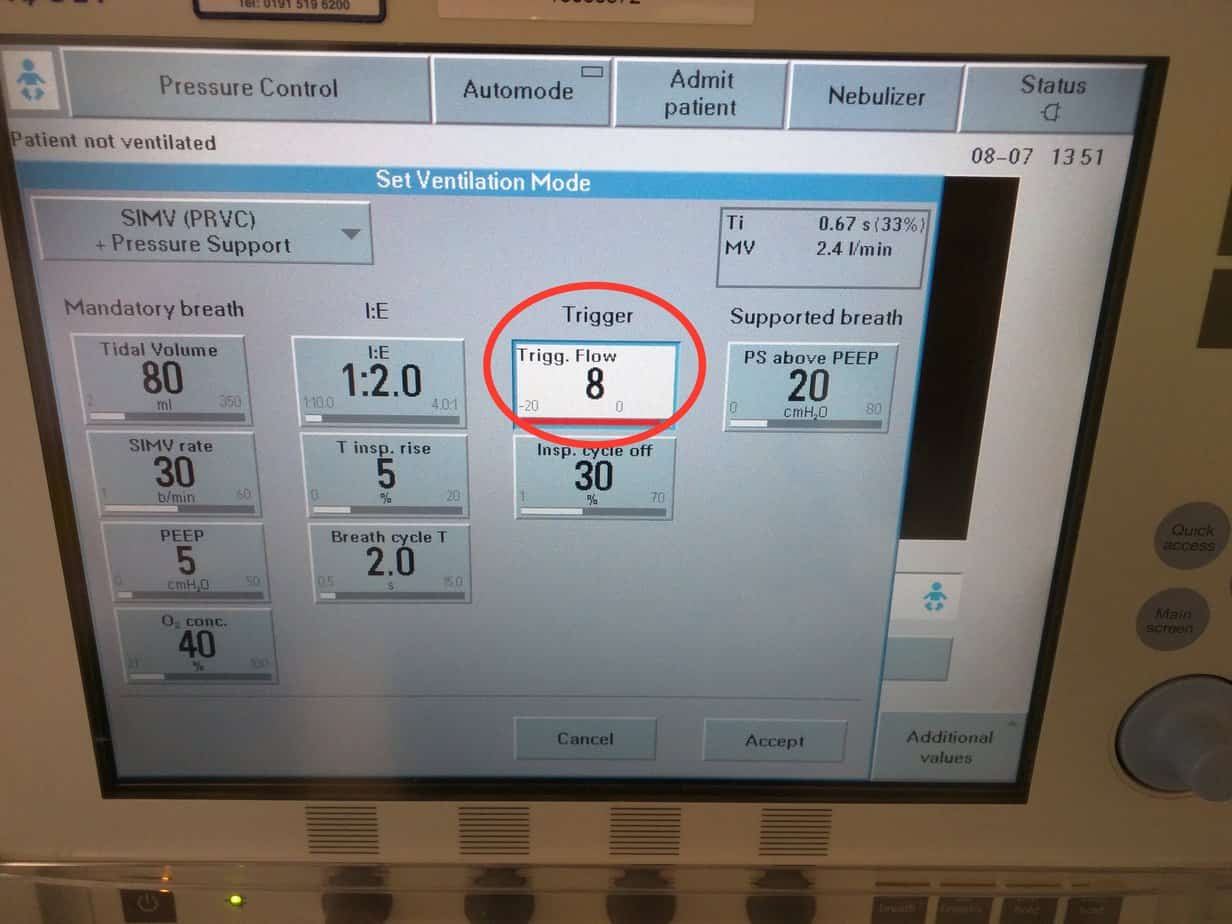
Turning the knob anticlockwise reduces the flow trigger sensitivity (minimum 1) and makes it harder for the patient to generate the flow needed to initiate a breath.
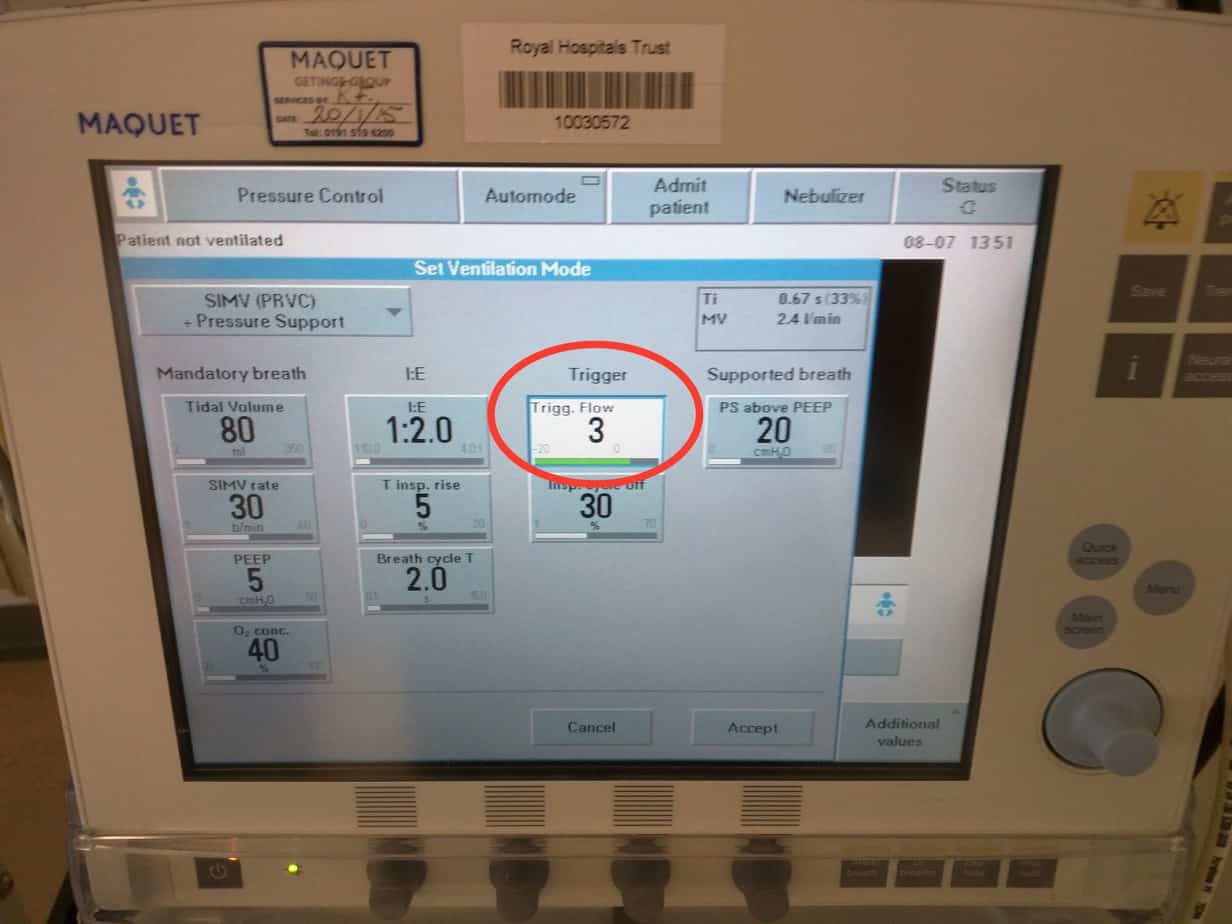
Having this set too low is a common cause of a patient struggling on the ventilator. Turning the knob further anticlockwise past a flow trigger of 1 will switch the triggering mode from flow to pressure.
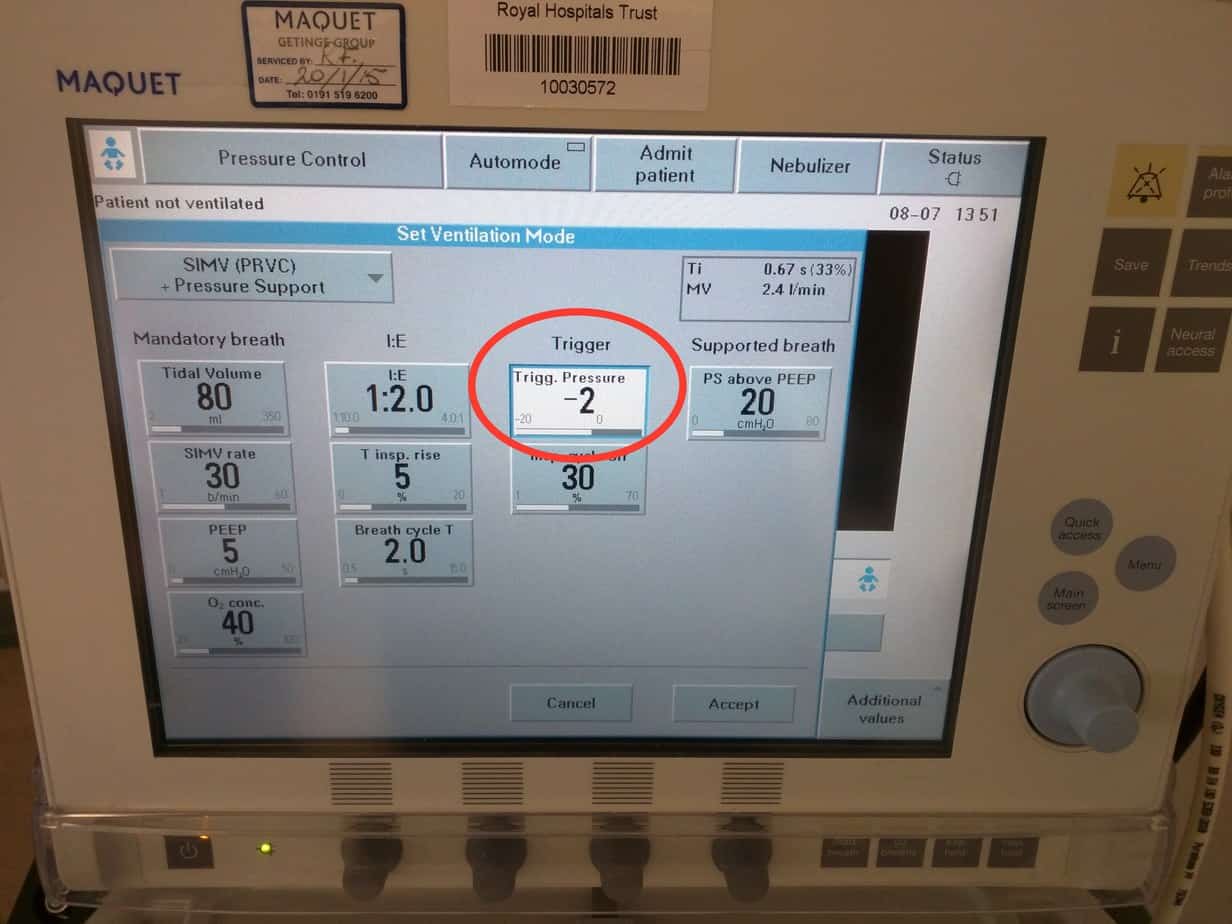
The patient will then need to generate the set pressure below set PEEP to initiate a breath. This mode is useful if the patient is having problems with auto-triggering, but requires the patient to breath against a closed valve in the inspiratory circuit, which only opens when the pressure threshold is reached (valve is open all the time with a flow trigger). The further the knob is turned anticlockwise, the more pressure below PEEP that has to be generated before the ventilator thinks the patient is trying to take a breath i.e. the harder the patient has to work. If the breath is triggered it will be shown as a purple mark on the ventilator graphs of ‘flow vs time’ or ‘pressure vs time’, depending on the trigger mode set.
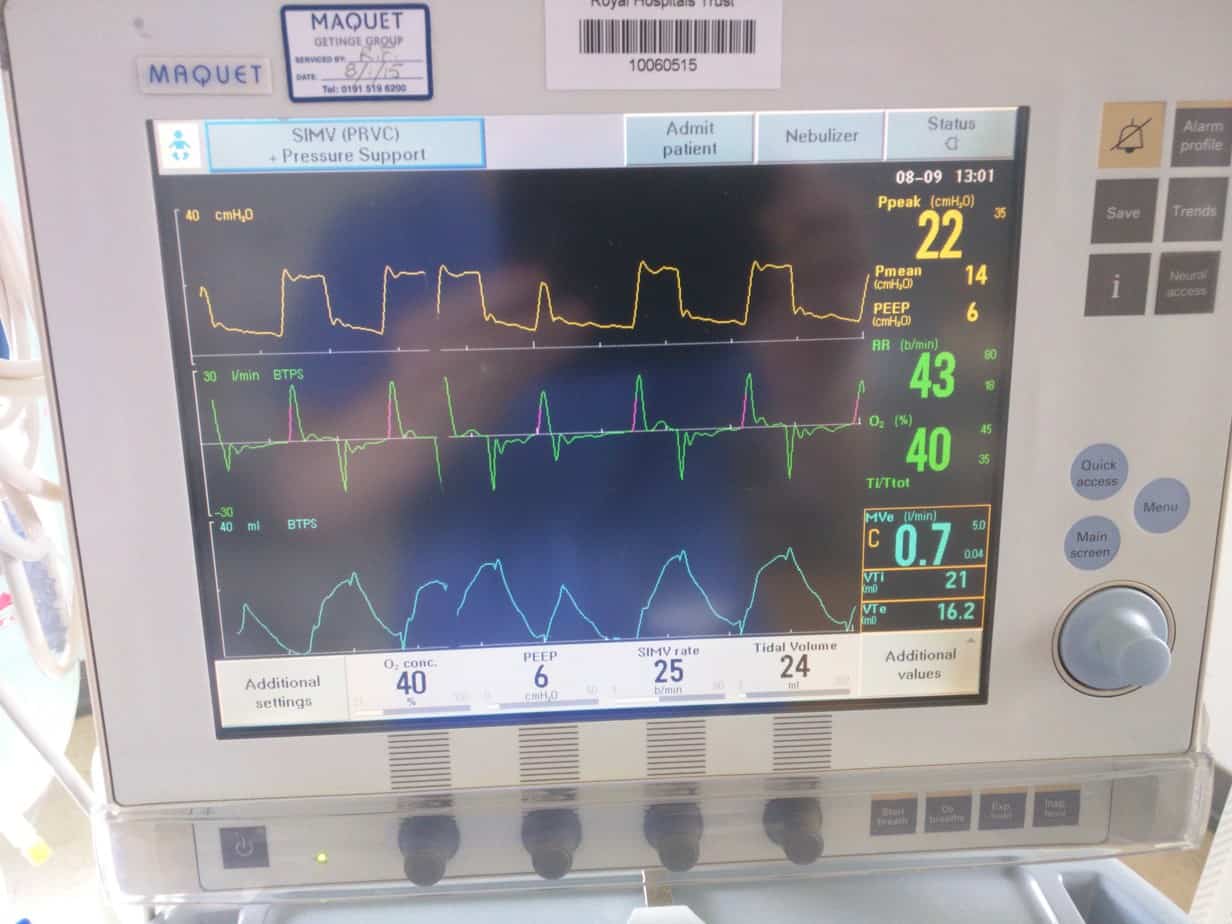
Flow Trigger
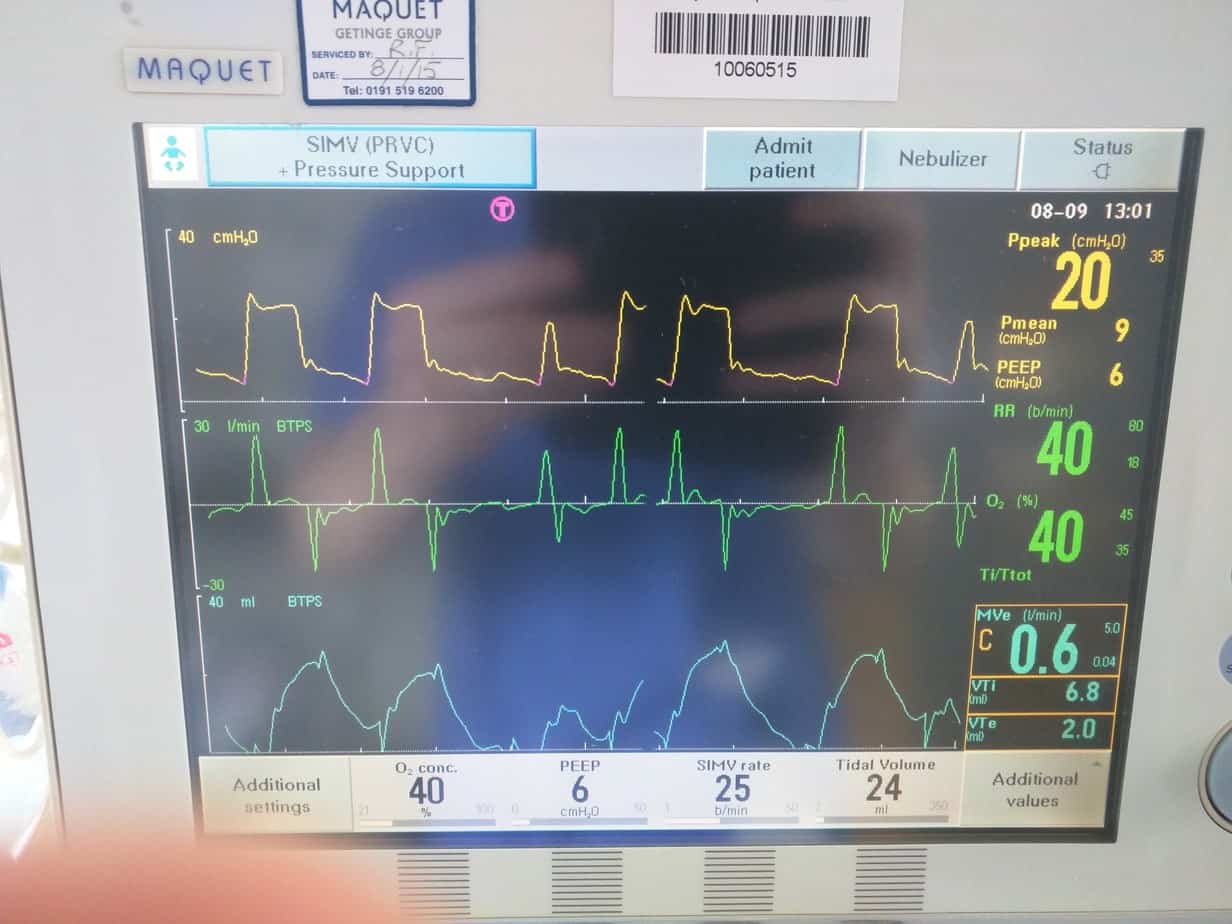
Pressure Trigger
Set Pressure Support above PEEP
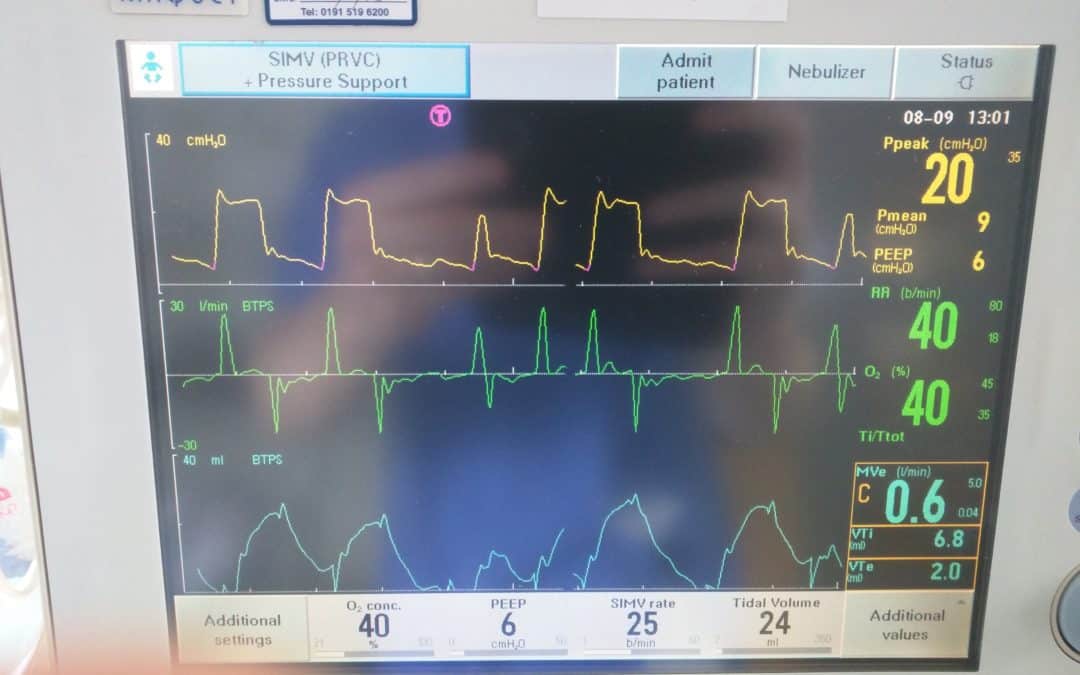
In ‘SIMV (PRVC) + Pressure Support’ all breaths that the patient initiates are supported. The ventilator will supply the patient with the set ‘SIMV rate’ number of breaths each minute, each of the set tidal volume and each breath lasting for the set Ti. If the patient takes any additional breaths (over and above the set ‘SIMV rate’) these breaths will also be supported, but to a lesser degree. These breaths will be supported with a ‘Pressure Support’ breath above the PEEP (but have no guaranteed tidal volume and no guaranteed Ti). It is important to remember that this is the pressure above PEEP, not the peak pressure. Normally start with a set Pressure Support of 12 cmH2O above PEEP, so if PEEP is set at 6 cmH2O this would result in all breaths taken above the set SIMV rate being supported with pressures of 18/6.
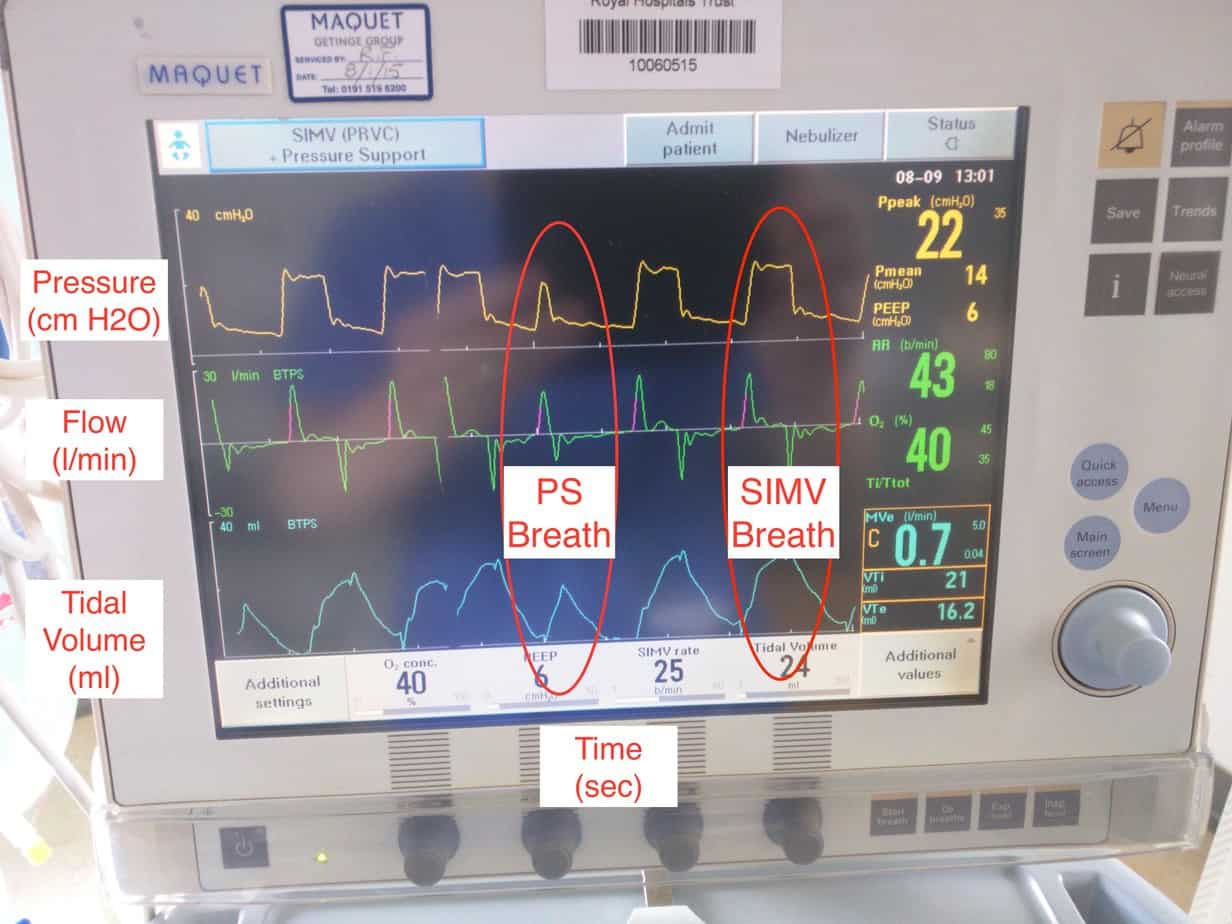
Note SIMV breath is longer due to set Ti resulting in more support and larger tidal volume
Once you are happy with your settings press ‘Accept’ to confirm the changes and ‘ok’ to confirm compliance compensation – if you don’t do this all changes you have made will be lost.
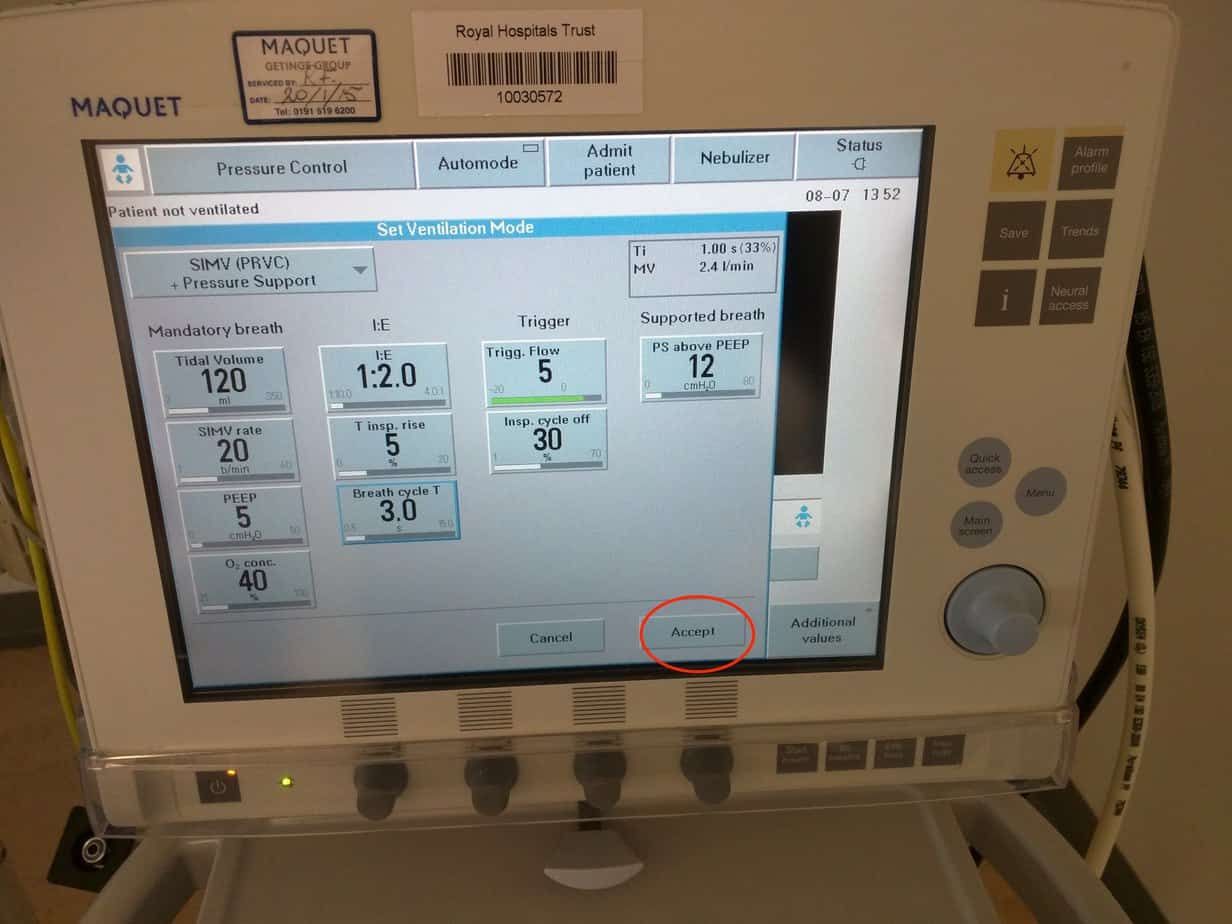

Press the Power button in the lower left hand corner to start ventilation.

Set Alarm Limits
Select ‘Alarm Profile’ from the top right hand corner of the ventilator.

This will open the ‘Alarm Profile’ screen (if the ventilator is already alarming, the reason for the alarm will be displayed with a bell symbol next to the appropriate limit.

Set the upper pressure alarm. In ‘SIMV (PRVC) + Pressure Support’ mode the ventilator will alarm 5 cmH2O below the set upper alarm limit (At 30 cmH2O if the upper pressure is set to 35 cmH2O). As well as alarming the ventilator will stop delivering the tidal volume, so you must check the inspired tidal volumes (displayed on the lower right hand corner of the ventilator).
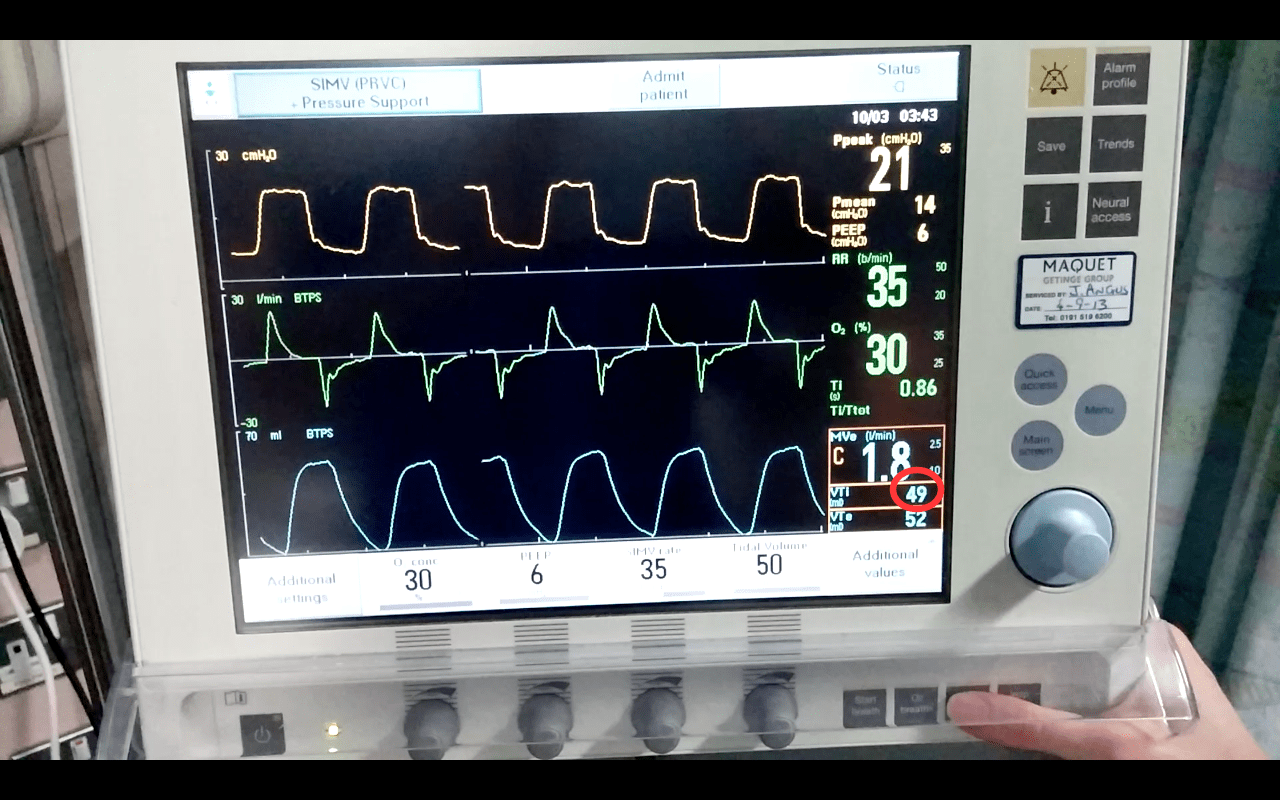
Adjust you other alarm limits as required (the currently delivered minute volume is displayed just above the inspired and expired tidal volumes to help you set the alarm limits).
Other Modes of Invasive Ventilation
SIMV (Pressure Control) + Pressure Support’

Instead of setting a tidal volume you set ‘Pressure Control above PEEP’ (remember this is the pressure above PEEP, not the peak pressure i.e setting ‘Pressure Control above PEEP’ to 15 and ‘PEEP’ to 6 will result is a ‘Peak Pressure’ of 21). The ventilator will then deliver this pressure for the duration of the inspired time, at the SIMV rate times per minute. The tidal volume delivered is not guaranteed and will vary depending on the compliance of the lungs, so if lung compliance worsens e.g. pneumothorax or collapse, the delivered tidal volume will decrease. This is why it is important to monitor the tidal volume delivered on the ventilator and make sure it is appropriate for the patient and to set tight limits on the minute volume, so the ventilator will alarm appropriately if this is reduced. This mode also supports all breaths and any breaths the patient takes above the set SIMV rate will be supported with a Pressure Support breath, just like in ‘SIMV (PRVC) + Pressure Support’. It is important to note that the ‘PC above PEEP’ can’t be reduced below what is set for ‘PS above PEEP’, nor ‘PS above PEEP’ turned above what is set for ‘PC above PEEP’ (this makes sense as the ‘PC above PEEP’ are meant to be the ‘big breaths’ and the ‘PS above PEEP’ are meant to be the smaller support breaths .
PS CPAP
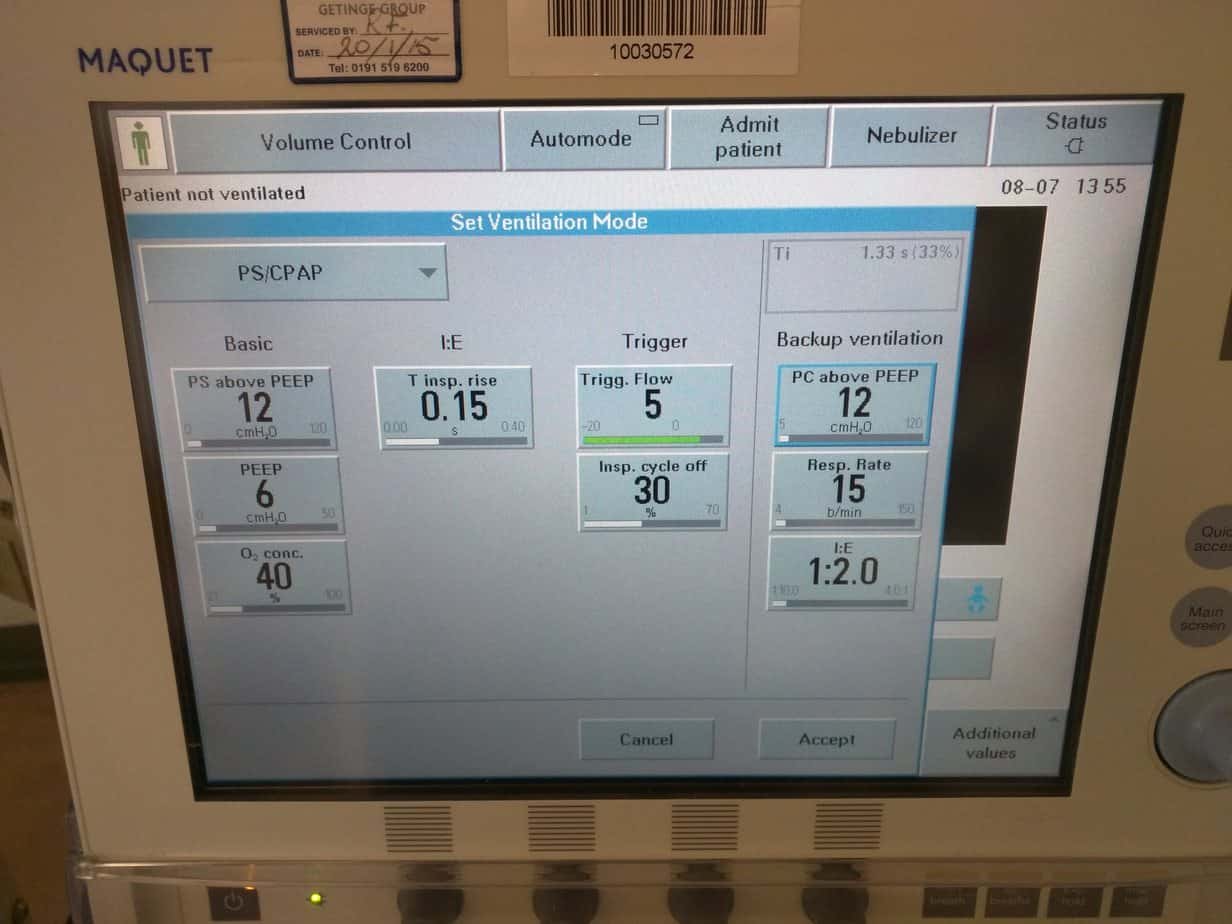
This mode just provides pressure support and PEEP. There is no guaranteed tidal volume and no set Ti. Every breath the patient takes is supported. Other methods of ventilation are often weaned to this prior to extubation.
Weaning Ventilation
As soon as able wean the rate in steps of 5 breaths. Provided the patient is triggering breaths at or above the set rate then all you will be doing is swapping a ‘big breath’ with a guaranteed Ti and tidal volume/Pressure for a smaller ‘Pressure Support’ breath.
Once you have reached a rate of 5 breaths per minute the next step is to switch the patient to PS CPAP (the patient will already be mostly on ‘PS CPAP’ as only 5 of their breaths will be ‘big breaths’ and all other breaths will be PS breaths. When switching to ‘PS CPAP’, keep the pressure support and PEEP set the same as it was on the previous mode.
Wean the PS in steps of 2 till a pressure of 6 cmH2O is reached. Wean PEEP to 6 cmH2O. If the patient is stable on PS CPAP ON 6/6 (peak pressure of 12) and there are no contraindications a trial of extubation can be considered.
You don’t need to wait till a certain point in the patients admission to start to wean them and can start weaning straight away (I would encourage you to ask yourself ‘can I wean’ on every gas you review). Signs that weaning is not being tolerated include increased work of breathing or increased ETCO2/PaCO2 (provided there is no significant increase in WOB or ETCO2 then a blood gas is not required for each weaning step).
![]()

Recent Comments